---
breadcrumbs:
- - /chromium-os/developer-library/guides
- ChromiumOS > Guides
page_name: firmware-test-manual
title: Firmware test manual
---
This is a Firmware test manual targeted for any tester needing to work with AP,
EC, or GSC firmware.
[TOC]
## Prerequisites
* See the [developer-guide] for details on the chroot
setup in order to launch FAFT (fully automated firmware tests) and servod.
* See the instructions on how to run [FAFT] including launching `servod` and
`test_that` commands.
* For details on ChromeOS firmware image, refer to
[ChromeOS firmware concepts].
## Bug Filing Procedure
* Collect device data and log
* Go to device [VT2](#virtual-terminals), run `generate_logs` and the
script will print the location at the end in the form of
`/tmp/log-*.tar.gz`. You will need to attach this log to the bug.
* Bug template. Go to https://issuetracker.google.com and under `Template`
drop down select `[FW Test]` with Component `ChromeOS > Firmware`.
### Generate and attach Logs
Run `generate_logs` on the device, scp the generated .tar.gz file to your
desktop and attach it to the bug.
### Get PD/EC Console Log while running Tests
First, you must locate the target PTY (pseudo-TTY) to use for console
communication.
* PD console
* Look for PD MCU console from the servod output.
* Or run `dut-control usbpd_uart_pty`.
* EC console
* Look for servod output “EC Console is being served on”.
* Or run `dut-control ec_uart_pty` to retrieve the pty.
* AP console
* Run `dut-control cpu_uart_pty`.
Once the desired PTY is known, multiple different tools can be used to connect
to that interface.
* Minicom
* Install minicom from chroot via `sudo emerge minicom`.
* Run `minicom -D /dev/pts/{PTS}` to open console.
* Press `Ctrl+A` and `q` to exit.
* CU
* Run `cu -s 115200 -l /dev/pts/{PTS}`.
* `Return ~~` and return to exit.
* Screen
* Run `screen /dev/pts/{PTS} 115200`.
* Press `Ctrl+A` and `q` to exit
## Device Precondition
Unless otherwise specified, device (sometime refer to as DUT - Device Under
Test) are assumed to be setup with ChromeOS test image and updated with the
target test firmware.
## Setup DUT for Case Closed Debugging (CCD)
If your DUT is running a production cr50 image, see the
[Case Closed Debugging] documentation.
## Device Mode Setup
### Check Device Mode (Developer, Normal or Recovery)
* From browser
1. Go to `chrome://system` from browser tab.
1. Locate `bios_info` section and click on the `Expand...` button next to
it.
1. `mainfw_type` should be set to normal or developer.
1. Run `crossystem mainfw_type` at the prompt, the value should be
normal, developer or recovery.
* From VT2
1. Run `crossystem mainfw_type` at the prompt. The returned value should
be one of the following: Normal, Developer, Recovery.
### Change Device Mode from Developer to Normal
#### Groot UI
1. [Check device mode](#check-device-mode) is set to `developer`.
1. Reboot the device (via power button).
1. You should see the screen with:
```
You are in developer mode
To return to the recommended secure mode,
select Return to secure mode below.
```
1. Select `Return to secure mode` option.
1. You should see the screen with:
```
Confirm returning to secure mode
This option will disable developer mode and restore your device to its
original state.
Your user data will be wiped in the process.
```
1. Select `Confirm` option.
1. System will reboot itself and switch to normal mode.
1. [Check](#check-device-mode) to confirm the device is in normal mode.
#### Pre-Groot UI
1. [Check device mode](#check-device-mode) is set to `developer`.
1. Reboot the device (via power button).
1. You should see the screen with:
```
OS verification is OFF
Press SPACE to re-enable
```
1. Press _space_ to enable OS verification, you should see:
```
OS verification is OFF
Press ENTER to confirm you wish to turn OS verification on.
Your system will reboot and local data will be cleared.
To go back press ESC.
```
1. Press _enter_ key to confirm, screen should display:
`OS verification is ON`
`Your system will reboot and all data will be cleared.`
1. System will reboot itself and switch to normal mode.
1. [Check](#check-device-mode) to confirm the device is in normal mode.
### Recovery Mode
Press the following key sequence to put the device into recovery mode.
* Chromebook: press `Esc + F3 + Power` (F3 is reload). On device like pixel,
you will need to hold the keys for more than 200 ms. On some device you
will need to press the Power button last and release first.
* Chromebox: Power down the device and locate the recovery button usually
hidden behind a pinhole on the device.
See [Chromebox pinhole example].
* Put a push pin or paper clip into the pinhole to press the recovery button,
at the same time press the power button to turn on the system. Once system
is booted, let go the recovery button.
* Recovery mode screen can be seen for following UI:
**Chromebook with Groot UI**
```
Let's step you through the recovery process.
Select how you'd like to recover.
You can recover using external storage such as a USB drive.
```
**Chromebook with Pre-Groot UI**
```
Please insert a recovery USB stick or SD card.
```
### Change Device Mode from Normal to Developer
#### Groot UI
1. Power on the device, if the screen shows `You are in developer mode`,
the device is already in developer mode.
1. [Check device mode](#check-device-mode) is set to `normal`.
1. Press Esc + F3/Refresh + Power to enter
recovery mode.
The screen should display:
```
Let’s step you through the recovery process.
Select how you’d like to recover. You can recover using
external storage such as a USB drive.
```
1. Press _Ctrl-D_ you should see:
```
You are attempting to enable developer mode.
This involves erasing all data from your device, and will
make your device insecure.
Select Cancel to remain protected.
```
1. If hitting _Ctrl-D_ does nothing, check
[Stuck at Recovery Screen](#stuck-at-recovery-screen).
1. Select `Confirm` and press ENTER, a screen would display the message:
```
You are in developer mode
To return to recommended secure mode, select “Return to
secure mode” below. After timeout, the device will
automatically boot from the selection below.
```
1. The System will reboot itself in 30 seconds (`to bypass the wait time, hit
Ctrl-D`).
1. [Check](#check-device-mode) to confirm the device is in developer mode.
#### Pre-Groot UI
1. Power on the device, if the screen shows `OS verification is OFF`, the
device is already in developer mode. On older chromebox, flip the switch on
the back to go to the developer mode.
1. [Check device](#check-device-mode) mode is set to `normal`.
1. Press `Esc + F3/Refresh + Power` to enter recovery mode.
The screen should display:
`ChromeOS is missing or damaged.`
`Please insert a recovery USB stick or SD card.`
1. Press _Ctrl-D_ you should see:
```
To turn OS verification OFF, press ENTER.
Your system will reboot and local data will be cleared.
To go back, press ESC.
```
1. If hitting _Ctrl-D_ does nothing, check
[Stuck at Recovery Screen](#stuck-at-recovery-screen).
1. Press _enter_, screen should display:
```
OS verification is OFF
Press SPACE to re-enable.
```
1. System will reboot itself in 30 seconds (to bypass the wait time hit
Ctrl-D).
1. [Check](#check-device-mode) to confirm the device is in developer mode.
### Developer Mode Screen Sequences
1. Press `Esc+F3+Power` at the login screen.
1. Press `Ctrl+D` at `ChromeOS is missing or damaged.`.
1. Press ENTER at `To turn OS verification OFF, press ENTER.`.
1. Press Ctrl+D at `OS verification is OFF`.
1. Screen changes to `Your system is transitioning to Developer Mode.`.
1. Screen will change to `Preparing system for Developer Mode.` after 30
seconds.
1. After few minutes, the system will return to OS login screen.
* Only on devices launched since 2020, interacting with the menu when in
the DEV screen will cancel the 30-second timer and stay at the DEV screen.
This is expected behavior.
## Firmware Shellball (chromeos-firmwareupdate)
Firmware Shellball is a shell archive or shar. Located on device as
`/usr/sbin/chromeos-firmwareupdate`.
### Firmware Update Modes
Refer to the [Firmware Updater] guide for
chromeos-firmwareupdate mode options.
### Extract and repack the Firmware Shellball
Refer to the [Firmware Updater Package] guide for more information.
* Go to [VT2](#virtual-terminals) and login as root.
* Create a new directory in `/tmp`, example: `mkdir /tmp/fw_binaries`
* Make a copy of firmware shellball, example:
`cp /usr/sbin/chromeos-firmwareupdate /tmp/fwupdater`
Follow the below instructions to repack the shellball
* Extract archive to `DIR` using `--unpack ` command, example:
`chromeos-firmwareupdate --unpack /tmp/fw_binaries/`
* For unified build
* copy or replace the images under `/images`, example
`cp image.bin ec.bin /tmp/fw_binaries/images`
* update the `firmware_image` and `ec_image` values (currently the 2nd and
the 4th fields - leave the other fields unmodified) for the right model
in the description file `/signer_config.csv`, for example:
```
model_name,firmware_image,key_id,ec_image,brand_code
mymodel,images/mymodel-v1.bin,MYMODEL,images/mymodel-ec-v1.bin,ZZCR
```
should be changed to
```
model_name,firmware_image,key_id,ec_image,brand_code
mymodel,images/image.bin,MYMODEL,images/ec.bin,ZZCR
```
* (OS version prior to M119): update IMAGE_MAIN and
IMAGE_EC path's in the legacy description file
(`/models//setvars.sh`), example:
`IMAGE_MAIN="images/bios.bin"`
* for non-unified build
* there is no `/images` and `/models` directories, so just
replace the `bios.bin`, `ec.bin`, `pd.bin` in top folder (`/`),
example: `cp bios.bin ec.bin /tmp/fw_binaries/`
* repack the shellback using `--repack ` command, example:
`chromeos-firmwareupdate --repack /tmp/fw_binaries/`
### Make rootFS Writable
* Run the command
`/usr/share/vboot/bin/make_dev_ssd.sh --remove_rootfs_verification `
`--partitions 2` to make rootFS writable.
* Run `reboot`.
* Note that, ChromeOS has be re-installed in order to run FAFT tests or
enable rootFS write protection.
## Firmware Versions
### Check Firmware Version
* RO BIOS (Read-only Application Processor Firmware): `crossystem ro_fwid`
* RW BIOS (Read/Write Application Processor Firmware): `crossystem fwid`
* EC: `ectool version`
* PD: `ectool --name=cros_pd version` OR `ectool --dev 1 version`
* cr50: `gsctool --any --fwver`
* Shellball version: `chromeos-firmwareupdate -V`
`crossystem fwid` gets the running AP firmware's version from
[/sys/devices/platform/chromeos_acpi/FWID](https://chromium.googlesource.com/chromiumos/platform/vboot_reference/+/HEAD/host/arch/x86/lib/crossystem_arch.c)
or
[/sys/devices/platform/GGL0001:00/FWID](https://chromium.googlesource.com/chromiumos/platform/vboot_reference/+/HEAD/host/arch/x86/lib/crossystem_arch.c)
or
[/sys/devices/platform/GOOG0016:00/FWID](https://chromium.googlesource.com/chromiumos/platform/vboot_reference/+/HEAD/host/arch/x86/lib/crossystem_arch.c)
on x86 devices and
[/proc/device-tree/firmware/chromeos/firmware-version](https://chromium.googlesource.com/chromiumos/platform/vboot_reference/+/HEAD/host/arch/arm/lib/crossystem_arch.c)
on ARM devices.
[chromeos-firmwareupdate](https://chromium.googlesource.com/chromiumos/platform/firmware/)
is the installer for both the AP Firmware and the EC firmware. When updating,
"Last Boot Version:" in the output is populated via crossystem. "Firmware
Updater:" (i.e. the version contained within the updater that it will attempt
to install when you execute the updater)
[is populated via the manifest](https://chromium.googlesource.com/chromiumos/platform/firmware/+/HEAD/pack/sfx2.sh)
that is part of chromeos-firmwareupdate.
### How to Check cr50 version with chrome://system
* Look for cr50_version, Click expand and look for RW version string.
* It is expected that you cannot rollback to an older version, once you've
installed a newer version.
### Flashing Firmware via Futility
If you are logged-in to the DUT:
`futility update -i PATH_TO/image.bin`
If the DUT is connected via a servo to a workstation (and servod is running on
your workstation):
`sudo futility update --servo -i PATH_TO/image.bin`
### Re-signing the Firmware
In the event that you need to resign a test firmware, refer to futility's inline
help:
`futility help sign`
### How to determine Firmware Version from the OS Image
* Go into chroot `cros_sdk`.
* Copy image onto locate disk /tmp
`sudo dd if=/dev/sdd of=/tmp/chromiumos_image.bin bs=1M`.
* Mount image
`/mnt/host/source/src/scripts/mount_gpt_image.sh -f /tmp `
`-i chromiumos_image.bin`.
* Run `/tmp/m/usr/sbin/chromeos-firmwareupdate -V` for firmware version.
* Run `cat /tmp/m/etc/lsb-release` for ChromeOS version.
* Run `/mnt/host/source/src/scripts/mount_gpt_image.sh -u` to unmount.
### Intel's Management Engine
* Intel x86 CPUs (Sandybridge and later) reserve a portion of the BIOS
firmware image for use by the Intel Management Engine (ME).
* Locate ME version by running `grep ‘^ME:.*version’ /sys/firmware/log`.
* ME region is locked for production. Refer to the
[firmware_LockedME] test for more information.
* Note that if you transition from a locked ME firmware back to an unlocked ME
firmware you must firmware flash via servo.
## Write Protect
For details about write protect, and how to enable and disable the feature,
please read [Write Protection].
## Power Delivery
## ChromeOS Image
To create a USB stick with a ChromeOS image, follow the instructions in the
developer guide at [Put your image on a USB disk].
If using a prebuilt image instead of one that is locally built, do the
following:
* Download a stable build that matches the device (or model) name.
* Unpack the file with `tar xvf *.tar.xz`.
* Insert USB stick and run the below commands (all the data on the USB
stick will be cleared).
`$ cd ~/chromiumos`
`cros flash usb:// chromiumos_test_image.bin`
To boot from a USB disk, follow the instructions at [Boot from your USB disk]
in the ChromiumOS Developer guide.
## Firmware Update
### Firmware Screen Names
Here is a list of the various SCREENs referenced in some test steps:
#### Legacy UI (devices launched until 2019)
* RECOVERY_SCREEN ([Recovery mode](#recovery-mode))
* `ChromeOS is missing or damaged. `
`Please insert a recovery USB stick or SD card.`
* DEV_SCREEN (Go to [recovery mode](#recovery-mode) and press `Ctrl+D`)
* `OS verification is OFF Press SPACE to re-enable.`
* NO_GOOD_SCREEN (This happens when the USB contains an unsigned image. Go to
developer mode to install unsigned ChromeOS using `Ctrl-U`)
* `The device you inserted does not contain ChromeOS.`
* REMOVE_SCREEN (Only for pre 2016 devices)
* `Please remove all external devices to begin recovery.`
* NORMAL_TO_DEV_CONFIRMATION_SCREEN
* `To turn OS verification OFF, press ENTER. Your system will reboot and
local data will be cleared. To go back, press ESC.`
* DEV_TO_NORMAL_CONFIRMATION_SCREEN
* `Press ENTER to confirm you wish to turn OS verification on. Your
system will reboot and local data will be cleared. To go back, press
ESC.`
* After pressing ENTER
* `OS verification is on. Your system will reboot and local data will
be cleared.`
* CRITICAL_UPDATE_SCREEN (Inform user to not turn off during EC update)
* `Your system is applying a critical update. Please do not turn off.`
New revised recovery screen for most device created post 2016.
* REMOVE_AND_START_SCREEN (AKA BROKEN_SCREEN)
* `ChromeOS is missing or damaged. `
`Please remove all connected devices and start recovery`
* INSERT_SCREEN
* `Please insert a recovery USB stick or SD card.`
#### Menu UI (devices launched 2020-current)
* RECOVERY_SCREEN ([Recovery mode](#recovery-mode))
* `Let's step you through the recovery process`
* DEV_SCREEN (Go to [recovery mode](#recovery-mode) and press `Ctrl+D`)
* `You are in developer mode`
* NO_GOOD_SCREEN (This happens when the USB contains an unsigned image. Go to
developer mode to install unsigned ChromeOS using `Ctrl-U`)
* `No valid image detected`
* REMOVE_SCREEN
* `Please remove all external devices to begin recovery.`
* NORMAL_TO_DEV_CONFIRMATION_SCREEN
* `You are attempting to enable developer mode`
* DEV_TO_NORMAL_CONFIRMATION_SCREEN
* `Confirm returning to secure mode`
* CRITICAL_UPDATE_SCREEN (Inform user to not turn off during EC update)
* `Your system is applying a critical update. Please do not turn off.`
* REMOVE_AND_START_SCREEN (AKA BROKEN_SCREEN)
* `Something went wrong`
* INSERT_SCREEN
* `Connect your external storage device`
New screen for diagnostic tools device created post 2020.
* DIAGNOSTICS_SCREEN
* `Diagnostic tools`
`Select the component you'd like to check.`
##### Menu UI Screen State Diagram

## General Procedure
### Basic
* Firmware consists of BIOS and EC.
* EC is required for keyboard and mouse pad (aka laptop).
* Older Chromebox does not have EC firmware.
* The top row of keys are really function key and labeled as F1, F2,..
### Virtual Terminals
There are 4 types of terminals.
* Go to VT1 by pressing `Ctrl + Alt + F1` (top row back arrow key).
* Go to VT2 by pressing `Ctrl + Alt + F2` (top row forward arrow key).
* Go to VT3: `Ctrl + Alt + F3` mostly for console log output.
* Go to crosh by logging in with guest mode and pressing `Ctrl + Shift + T`.
### Update GBB Flags (AKA extend recovery screen timeout)
[GBB flags] are located in a read-only region of firmware, and control various
firmware features (developer mode, EC software sync, etc). They can be
manipulated for ease of developer and testing experience:
* A device may be setup with a very short timeout in recovery screen
which makes reading the content difficult. You can reset the timeout to
the default value of 30 seconds by resetting the GBB flag. Go to
[VT2](#virtual-terminals) and run `futility gbb --set --flash --flags=0`
followed by `reboot`.
If `futility(1)` returns error, you will need to make the
[BIOS writeable](#make-bios-writeable) and retry.
* To read GBB value of device bios, run `futility gbb --get --flash`.
### Stuck at Recovery Screen
* [Reset EC](#reset-ec) and restart the system.
* Remove all USB devices(in particular security keys will block keyboard
input)
* Press the tab key to see why the device failed to boot. See the
[troubleshooting](#troubleshooting) section on how to resolve.
* [Reset TPM](#reset-tpm-values) values if`tpm_fwver` and `tpm_kernver`
are triggering rollback protection enforcement.
* Your device may already be in developer mode.
* Install recovery image and restart the procedure.
### Reset EC
* Press `F3/Refresh + Power` to reset EC. Note that this is not applicable to
chromebox and wilco devices.
* For wilco devices, pressing `F3/Refresh + Power` will reset EC and also put
the device in recovery mode.
### Reset TPM Values
The version of the keys used to sign the firmware and kernel are stored in the
trusted platform module (TPM) and are used for rollback protection, i.e. in
normal mode you cannot boot a firmware or kernel whose key version is less than
what is stored in the TPM. The versions of the keys are reported from
crossystem as `tpm_fwver` and `tpm_kernver`.
In most testing scenarios, you will be using dev-keyed firmware builds. For
dev-keyed firmware builds the key versions stored in the firmware will map to a
value of 0x10001 for tpm_fwver. You might need to reset the values in the TPM
if you were running another firmware build that had higher key versions and you
now want to run a dev-keyed build. You can reset the stored values as follows:
* Recovery boot from a test image: press `ESC + Refresh/F3 + Power` and insert
a test image to boot.
* Go to [VT2](#virtual-terminals) and run `chromeos-tpm-recovery`.
`crossystem tpm_fwver tpm_kernver`.
* Next, `reboot` the device after `chromeos-tpm-recovery` successfully
finishes (i.e. returns with no errors).
* Finally, go to VT2 and check if the values were successfully reset to 0x10001 by
inspecting the output of `crossystem tpm_fwver tpm_kernver`.
### Power State
Run `power_supply_info` from VT2 to report power related stat like details on
battery state, battery charge percentage, if AC power is plugged in.
### Get device IP
* From VT2, type `ip addr`.
* From VT1 open network window on lower right, click on the [i] icon.
### Hardware ID Mismatch
* If the system boots with a warning `A factory error has been detected`, this
indicates there is a hardware ID mismatch and mostly due to installation of
test image. Either `skip for now` OR use
`gbb_utility -s --hwid="DESIRED_HWID"`
to update the HWID in GBB flags and reflash firmware.
### LED Color Charge State
Refer to the "LED behavior" section of the latest requirements for the relevant
form factor. See the [Latest Chromebook requirements] for clamshell devices;
that page has links to requirements for other form factors.
### Mount USB stick on ChromeOS Device
* Run `fdisk -l` to locate the USB device name.
* A list of USB device name will be displayed, for example, `/dev/sdb` or
`/dev/sda1`.
* Run `mount device_name /mnt`to mount USB stick as `/mnt`, for example
`mount/dev/sda1 /mnt`.
### Storage
Before putting away the device for long term storage, open VT2 and run
`ectool batterycutoff`.
## ChromeOS Firmware Troubleshooting
### Checking Failure Status
In order for the firmware to help, we will need to know the following details:
* Is the developer switch enabled or disabled? Did you change it before seeing
this failure?
* Will manually reboot (hold power button for 8-10 seconds) solve the problem?
* Will cold reboot (remove battery and AC power, then attach power and
restart) solve the problem?
* If you can reproduce the issue, run command "dev_debug_vboot" before next
failure reboot and attach the output log.
### Getting Recovery Reason
On recent firmware (both x86 and arm), a new feature is added to help
diagnosing boot (recovery screen) failure. When you see the BIOS screen
(whether a blue/pink developer screen or recovery screen), try to press the TAB
key. Some debug message should appear on left-top corner of the screen,
including HWID string and a code for the reason why your device enters recovery
mode.
Find the message "Recovery Reason: 0x??", where ?? is a hex number; then find
the corresponding entry in this document (or the source header).
### Frequently Encountered Recovery Reasons
Here is the list of well-known recovery reasons and possible solutions.
* 0x02: **The hardware recovery button was triggered**
* When user accidentally hits the recovery button (esc+refresh+power).
* On newer devices (2013+), power OFF and power ON will fix this issue.
* 0x05: **TPM error in read-only firmware**
* Cold reboot (remove battery and AC power, then attach power and
restart).
* If still failing after that, try contacting the firmware team.
* 0x11: **Developer flag mismatch**
* Installing Recovery image will fix this issue.
* 0x13: **Unable to verify key block**
* Installing Recovery image will fix this issue.
* 0x14: **Key version rollback detected**
* Reset the TPM: boot a test image in recovery mode
(esc + refresh + power) and run `chromeos-tpm-recovery`.
* 0x17: **Firmware version rollback detected**
* Reset the TPM: boot a test image in recovery mode
(esc + refresh + power) and then run `chromeos-tpm-recovery`.
* 0x1b: **Unable to verify firmware body**
* Flash firmware (bios & ec) using futility tool or with servo to fix.
* 0x2b: **Secure NVRAM TPM initialization error**
* Close the lid/ shutdown the DUT, then power on after 20 seconds
* 0x43: **OS kernel failed signature check**
* The kernel looks invalid. This is usually caused by key mismatch,
data corruption, or memory / driver / IO error in last boot.
* Can be solved by installing Recovery image, or re-key your firmware.
* See the next section for further debugging details.
* 0x48: **No bootable disk found**
* Installing Recovery image will fix this issue.
* 0x54: **TPM read error in readwritable firmware**
* Need to reboot (refresh+power) or power cycle > 30 times to wipe TPM
* 0x5b: **No bootable kernel found on disk**
* Can be solved by installing Recovery image.
* Or try to re-key your firmware (make sure write protection removed, or
already CCD open):
* Switch DUT to developer mode and boot
* Run `chromeos-firmwareupdate --mode=recovery --force`
* See the next section for further debugging details.
## Debugging "OS missing" failures (0x43, 0x5b)
To boot into system, the verified firmware must complete following:
1. Find internal storage (eMMC, SSD, or NVMe).
2. Read and parse a valid GPT (Partition table).
3. Find a partition with "ChromeOS kernel" type and is marked as "good and
ready for booting" (by GPT attributes).
4. Load the kernel contents into memory and verify its digital signature.
5. Jump into loaded kernel.
The verified boot firmware has changed the recovery code several times. For
old devices, failure in step 1~4 may result in error code 0x48, 0x5a, 0x42, or
other values. For most devices today the error codes for each steps listed
above are:
1. Failed finding storage: `0x5a VB2_RECOVERY_RW_NO_DISK`
2. Failed getting GPT: `0x5b VB2_RECOVERY_RW_NO_KERNEL`
3. Failed finding kernel entry: `0x5b VB2_RECOVERY_RW_NO_KERNEL`
4. Failed verifying kernel: `0x43 VB2_RECOVERY_RW_INVALID_OS`
The difference between 0x5b "No bootable kernel found on disk" and 0x43 "OS
kernel or rootfs failed signature check" is if the firmware can find at least
one partition table entry with "ChromeOS kernel" type and proper boot priority
attributes. However, the two errors can be particularly frustrating to debug, as
there are many potential causes:
* **KEY MISMATCH**: Kernel signing key is different from firmware (for example
disk image is MP signed and firmware is DEV signed).
* **CORRUPTED**: Kernel partition itself is never provisioned (i.e., empty),
damaged or corrupted for some unknown reason.
* **DMVERROR**: The Device Mapper Verity driver, which ChromeOS used for
checking rootfs correctness, detected some error (by I/O or memory failure,
data corruption or malicious attack) in last boot - which will trigger
kernel marking the kernel partition with "DMVERROR" and refuse to keep
booting that partition. This is often found on devices with bugs in storage
drivers or improper memory calibration. Many devices in early build phase
may have memory issues and resulting this error, especially during Run-In
tests.
### Collect information
When on the error screen, press `[tab]` to get debug information and collect.
Since there are three potential reasons to the failure, to debug we need to read
back the firmware and disk contents of the device. Connect servo (or enable CCD)
and then:
* Read back firmware using Servo (or CCD), save to a file as `image.bin`.
* Create a firmware image to turn on booting from USB by setting GBB flags.
```
# Copy the image file readback from device to a new one.
cp image.bin image_0x38.bin
# inside chroot
futility gbb -s --flags 0x38 image_0x38.bin
```
* Flash the `image_0x38.bin` back to the device using Servo (or CCD).
* Prepare a USB stick with test image (so we can enter shell) and attach to
device, and boot from it (press Ctrl-U when you see developer screen).
* Enter shell to collect partition table and kernel partition contents:
```
# Find the right internal storage on your device. That can be:
# eMMC = /dev/mmcblk0, mmcblk0p2, mmcblk0p4
# SATA/SSD = /dev/sda, sda2, sda4
# NVMe = /dev/nvme0n1, nvme0n1p2, nvmp0n1p4
# The example below is assuming you have eMMC:
cgpt show /dev/mmcblk0 >/tmp/gpt.txt
dd if=/dev/mmcblk0p2 bs=1M | gzip -c >/tmp/kern.2.gz
dd if=/dev/mmcblk0p4 bs=1M | gzip -c >/tmp/kern.4.gz
```
* Now, pack everything (`image.bin`, `gpt.txt`, `kern.2.gz`, `kern.4.gz`) and
upload them to report the issue for analysis.
### Failure in Finalization
If the device goes to the recovery page with "OS missing" errors immediately
after running factory finalization, that may be caused by "unexpected reboot or
failure during finalization", since in the process we will de-active test image
partitions (2) and enable release partition (4). Check the factory logs for
this.
As a reference, we have seen few finalization issues that failed after GBB was
cleared (and before the new release partition was activated):
- [147722589](https://issuetracker.google.com/147722589): Failed creating logs.
- [147314850](https://issuetracker.google.com/147314850): Failed (to enter or complete wipe-in-place.
### Failure during run-in
If the DUT goes to 0x43 during run-in tests, it's usually caused by DMVERROR
or other storage driver issues. The following sections will help you to get more
details.
### Find active partition
Read `gpt.txt` and look for partition 2 and 4, which should look like
```
69 65536 2 Label: "KERN-A"
Type: ChromeOS kernel
UUID: 8AF3A85D-AC80-A44F-AA0A-CA8C73E66811
Attr: priority=1 tries=0 successful=1
...
65605 65536 4 Label: "KERN-B"
Type: ChromeOS kernel
UUID: 0BC160CA-E154-1749-9F79-D5838FAAD064
Attr: priority=0 tries=15 successful=0
```
There must be at least one partition with priority > 0 and (tries > 0 or
successful = 1). Use that partition for the following tests.
Note for devices failed immediately after factory finalization, they should
have active = 4. For devices failed recovery, active = 2. For failure after
OOBE or Auto Update, both partitions may be active, so choose the one with
higher priority.
The examples below will assume your active one is 4 (`kern.4.gz`).
### Check kernel integrity
Run the command in chroot to check:
```
gunzip kern.4.gz
futility verify kern.4
```
If the kernel looks good you should see some information like:
```
Keyblock:
Signature: ignored
Size: 0x4b8
Flags: 7 !DEV DEV !REC
Data key algorithm: 4 RSA2048 SHA256
Data key version: 1
Data key sha1sum: d6170aa480136f1f29cf339a5ab1b960585fa444
Preamble:
Size: 0xfb48
Header version: 2.2
Kernel version: 1
Flags: 0
Body load address: 0x100000
Body size: 0x7d7000
Bootloader address: 0x8d6000
Bootloader size: 0x1000
Body verification succeeded.
Config:
console= loglevel=7 init=/sbin/init cros_secure root=/dev/dm-0 ......
```
Otherwise, the kernel is either corrupted with unknown reason or by DMVERROR.
### Check DMVERROR
Print the first 8 bytes of kernel blob to check.
```
dd if=kern.4 bs=1 count=8 2>/dev/null
```
A real ChromeOS kernel should have `CHROMEOS`.
For devices failed due to DM verity error, that will be `DMVERROR`. You will
want to run a memory stress test (stressapptest) to see if this is caused by
memory issues. Otherwise, it may be failure by storage driver, or even hardware
failure inside storage.
If you see anything else (or nothing), it is probably fully corrupted or an
empty partition.
### OS image key mismatch
In normal mode, firmware and storage partitions must be signed with matching
keys for boot to succeed. If the keys mismatch, you may encounter this error.
The debug screen contains key information in the following fields:
- `gbb.rootkey`
- `gbb.recovery_key`
These keys correspond to entries in the `platform/chromeos-hwid` repository.
For newer boards, the corresponding file is `v3/${BOARD}`.
See entries under the `firmware_keys` section for valid values for a given
device. Also, if you see `b11d74edd286c144e1135b49e7f0bc20cf041f10` as root key
then your firmware is using DEV (also known as "unsigned") keys.
To change the keys on a device, disable hardware write-protect and flash a
recovery image with the desired key. See the [Firmware Write Protection]
document for details.
If you can't access chromeos-hwid or are not sure which keys were installed on
the DUT and just want to know if the boot failure is caused by keys mismatch,
follow the steps:
```
futility verify image.bin
futility dump_fmap image.bin -x VBLOCK_A:vb.a VBLOCK_B:vb.b
futility verify kern.4 --publickey vb.a
futility verify kern.4 --publickey vb.b
```
At least one of `vb.a` or `vb.b` should decode kernel partition properly with
something like:
```
Keyblock:
Signature: valid
Size: 0x4b8
Flags: 7 !DEV DEV !REC
Data key algorithm: 4 RSA2048 SHA256
Data key version: 1
Data key sha1sum: d6170aa480136f1f29cf339a5ab1b960585fa444
Preamble:
Size: 0xfb48
Header version: 2.2
Kernel version: 1
Flags: 0
Body load address: 0x100000
Body size: 0x7d7000
Bootloader address: 0x8d6000
Bootloader size: 0x1000
Body verification succeeded.
Config:
console= loglevel=7 init=/sbin/init cros_secure root=/dev/dm-0 ...
```
If you can't verify the active kernel by either firmware (in A or B), then it's
probably caused by firmware key mismatch.
### Corrupted image on storage
The simplest cause of this error is that there is no valid image on the disk.
To confirm if this is the case, you should follow the following steps:
- Flash an OS image onto a USB stick, and attach it to the DUT.
- On VT2, run the following commands:
`dd if=/dev/mmcblk0p2 of=/usr/local/dump_2.bin bs=8 count=1` and `hexdump -n 8 /usr/local/dump_2.bin -c`
`dd if=/dev/mmcblk0p4 of=/usr/local/dump_4.bin bs=8 count=1` and `hexdump -n 8 /usr/local/dump_4.bin -c`
Both should return with the string "CHROMEOS". If not, the partition is
corrupted, and that is what is preventing boot.
Consult the ChromeOS [Disk format] document for more details on expected image
format.
### eMMC/NVMe/SATA communication errors
Data corruption from storage can cause signature checking to fail. This is a
good case to check for if using a new storage part or the hardware design is
early in development. This is especially suspicious if the system boots
reliably over USB.
To diagnose this potential issue, run the quick storage test:
`tast run storage.QuickStress*`
TODO(b/295578792): Replace this with a different test.
### Communication errors with cr50
#### Bad straps
Bad hardware strap information for H1 can disrupt communication between cr50 and
the AP (Application processor). The cr50 console will log strapping information
at boot, with a line like this:
`[0.006304 Valid strap: 0x2 properties: 0x21]`
If the strapping configuration is invalid, instead, a line like this will be
emitted:
`[0.006244 Invalid strap pins! Default properties = 0x46]`
#### Pulse width too short for SoC
cr50 sends pulses on the interrupt line that are ~2.6us in length. SoCs should be
careful to manage clock gating registers to ensure that pulses that short may
be detected, otherwise TPM communication may fail.
## ChromeOS Installation Troubleshooting Guide
### Introduction
This document describes the process to restore your device when the device no
lo nger boots or is stuck at the recovery screen. The general problem is
usually a key mismatch between OS and firmware. There are three main types of
keys: `MP`, `pre-MP` and `Dev (test)`. Special care is needed with key
changes. Here is a table on when you need special care and when it is a simple
upgrade.
| | To Dev/Test | To PreMP | To MP version N | To MP version N+M |
|---------------------|-------------------------------|-------------------------------|------------------------------------|------------------------------------|
|From Dev/Test: | Normal Install | Normal Key Change (flowchart) | Normal key change (flowchart) | N/A |
|From PreMP: | Normal key change (flowchart) | Normal Install | Normal Key Change | N/A |
|From MP version N: | Reset TPM | Unlikely to Happen | Normal Install | Normal upgrade (need confirmation) |
|From MP version N+M: | N/A | N/A | Normal install (need to clear TPM) | N/A |
Your device must be in working order in order to switch OS with a different key.
Once you are stuck at the recovery screen you will need to perform extra steps
to restore the device to working order.
### Use Dev image as bridge
The fool-proof method is to install a dev sign OS and firmware before switching
to the new OS. Here are the high level steps:
* Install dev image
* Remove hardware and software write protect
* In `VT2`, run `chromeos-firmwareupdate --mode=recovery` to update dev
signed firmware on device
* Recovery boot via `esc + refresh + power`
* Insert recovery USB of your choice, the system should reboot and reset the
firmware matching the USB stick.
### Flow Chart
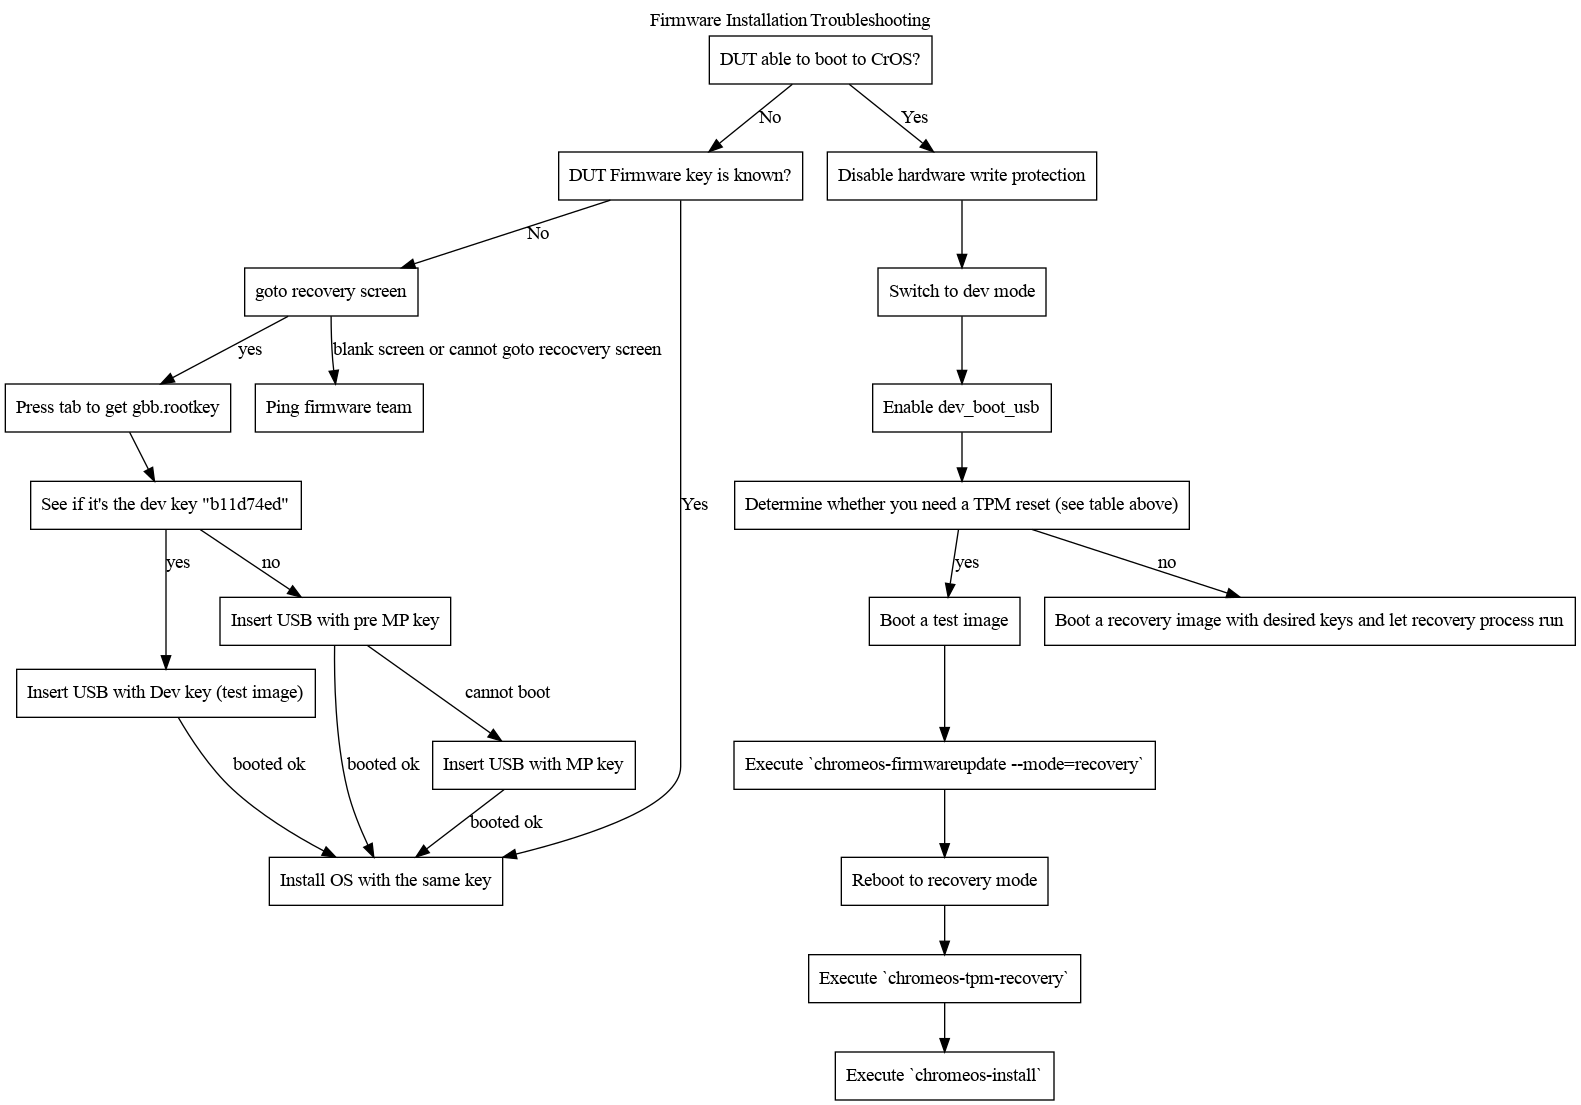
### Step 1: Before you start
#### Determine the key of your DUT image
`cat /etc/lsb-release` and check the value of `CHROMEOS_RELEASE_BOARD` to
determine your image key. For example, on swanky, `CHROMEOS_RELEASE_BOARD` is
set to `swankey-signed-mpkeys` which indicates that the device has `MP signed
image` on the system. You will need this information in order to determine
which path to take below. If you don’t know there is a way to find out in Step
2.
#### Select migration path
There are 3 types of keys: `MP`, `PreMP` and `Unsigned (aka test image)`. If
your source image key and target image key is the same, you will have no issue.
If the source and target is different you will need special care. It is rare
that you will need to go from `MP` key to `PreMP` key, if you must, switch to
dev image first.
### Step 2: State of your device
#### The device is fully working
Fully working means you can boot to ChromeOS successfully. If your DUT can boot
to ChromeOS, skip to section "Migrate your device" and follow the directions.
#### The device is stuck at recovery screen
You will need to restore your device to a working order before continue. You
will need to reinstall the device with an OS signed with the same key type.
Once you have done that, you can go to "Migrate your device" and follow the
directions.
#### Device stuck at recovery screen and don’t know the original OS key type
There are two ways to determine the original image key of your DUT if you can
get to the OS:
1. get `gbb.rootkey`, locate key in factory firmware and get key type
1. create USB stick for each type and insert stick at the recovery screen until
it boots
To get `gbb.rootkey`, press `tab` at the recovery screen.
To find the HWID file that describes the keys for a given device, go to the
[chromeos-hwid repository] and find the desired file for the given device name.
### Step 3: Migrate your device OS
Below are list of high level steps.
#### From MP key image to preMP key image or unsigned image
You will need test firmware, and a USB stick with the target OS image flashed
onto it.
1. Disable hardware write protect
* remove screw, unplug battery, or disable through CCD
(mechanism depends on target device)
* `crossystem wpsw_cur` from VT2 should return 0 to indicate you have
successfully disabled write protect.
1. disable software write protect, `futility flash --wp-status`
should return disabled
1. boot from USB
* change device to dev mode
* set `crossystem dev_boot_usb=1`
* reboot
* ctrl-U to boot from USB
1. install OS and firmware from VT2
* `chromeos-firmwareupdate --mode=factory`
* `chromeos-install`
* reboot
1. set GBB value to 0
1. reset TPM if either `tpm_fwver` or `tpm_kernver` != `0x10001`
#### From pre-MP key image to MP key image or unsigned image
Same instructions as the section above.
#### Reset DUT with unsigned image
You will need an USB stick with the unsigned ChromeOS image.
1. remove hardware write protect
1. boot your device to ChromeOS
1. go to recovery mode
1. insert USB with OS image and boot
1. disable software write-protect `futility flash --wp-disable`
1. reset firmware `chromeos-firmwareupdate --mode=factory`
1. install image with `chromeos-install`
1. `shutdown -P 0` to shutdown
1. press power to start OS
1. reset GBB
1. reset TPM if either `tpm_fwver` or `tpm_kernver` > `0x10001`
#### From unsigned image to MP key image or premp key image
Same as [Reset DUT with unsigned image](#reset-dut-unsigned) except you will
need to boot your device to ChromeOS with:
Device in dev mode
1. set `crossystem dev_boot_usb=1`
1. reboot
1. ctrl-U to boot from USB
### Possible problems
1. bad USB
* get a new USB stick or use a known good one.
1. corrupt image on USB
* some test will cause USB stick to be corrupted
* recreate USB stick with image
1. USB has the right image
* when in doubt flash a new image and try again
## Kernel log Troubleshoot Guide
### Commands to inspect kernel log information
Go to VT2, press the dmesg command to check the messages.
Linux kernel can print logs and trace messages, which can by default be
stored in a ring buffer. dmesg is a one type of shell command on the kernel
, which displays the content of the ring buffer. Another way to display the
contents of the kernel log is to look at the content of the file /var/log/messages.
/var/log/messages includes all the system messages including from the boot process
of the chromeOS along with dmesg output.
[Boot from your USB disk]: /chromium-os/developer-library/guides/development/developer-guide/#boot-from-your-usb-disk
[Chromebox pinhole example]: https://storage.googleapis.com/support-kms-prod/SNP_A5E29551DE747AFC2885B00F04E711DFD82C_6010520_en_v0
[ChromeOS Firmware Concepts]: /chromium-os/developer-library/guides/firmware/firmware-porting-guide/2-concepts
[chromeos-hwid repository]: https://chrome-internal.googlesource.com/chromeos/chromeos-hwid/
[Case Closed Debugging]: https://chromium.googlesource.com/chromiumos/platform/ec/+/cr50_stab/docs/case_closed_debugging_cr50.md
[Configuring Automounting]: https://help.ubuntu.com/community/Mount/USB#Configuring_Automounting
[data_fmap_expect_p.txt]: https://chromium.googlesource.com/chromiumos/platform/vboot_reference/+/HEAD/tests/futility/data_fmap_expect_p.txt
[developer-guide]: /chromium-os/developer-library/guides/development/developer-guide/
[Disk format]: /chromium-os/developer-library/reference/device/disk-format
[EC documentation]: https://chromium.googlesource.com/chromiumos/platform/ec/+/HEAD/README.md
[FAFT]: https://chromium.googlesource.com/chromiumos/third_party/autotest/+/HEAD/docs/faft-how-to-run-doc.md
[firmware_LockedME]: https://chromium.googlesource.com/chromiumos/third_party/autotest/+/HEAD/client/site_tests/firmware_LockedME/control
[Firmware Updater]: https://chromium.googlesource.com/chromiumos/platform/firmware/+/HEAD/README.md
[Firmware Updater Package]: https://chromium.googlesource.com/chromiumos/platform/firmware/+/HEAD/pack/README.md
[Firmware Write Protection]: /chromium-os/developer-library/reference/security/write-protection/
[GBB flags]: https://chromium.googlesource.com/chromiumos/platform/vboot_reference/+/HEAD/firmware/2lib/include/2gbb_flags.h
[Latest Chromebook requirements]: https://chromeos.google.com/partner/dlm/docs/latest-requirements/chromebook.html
[Put your image on a USB disk]: /chromium-os/developer-library/guides/development/developer-guide/#put-your-image-on-a-usb-disk
[Write Protection]: /chromium-os/developer-library/reference/security/write-protection/